Potty Language – What Your Pee Is Telling You

naturallylivinginthemaritimes.com

This is my favourite subject of all time.  Maybe because its taboo and I’m just weird, I don’t know.  But I figured that since this will be my last post before my wedding hiatus, I wanted to talk about something near and dear to my heart.  Pee.

What we’re going to focus on is what your pee is telling you about your overall health, because it’s indicative of many things.  We’re going to touch on:

  • colour
  • amount
  • PH
  • scent

Colour

What I do know is that I’ve been psyched about peeing since I was a kid.  I used to pretend my house was a cruise ship and when you peed, it powered the ship.  Hey, pee is the same colour as fuel, right? Sort of?

Well, not for everyone.  I recently came across this image, which my boy-scout fiance was very familiar with.  It’s a urine colour chart to recognize your level of dehydration.

urinecolour

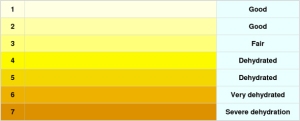
I drink water like it’s going out of style.  Part of that came from working on a hot, humid pool deck from years and having a round of heat exhaustion one summer.  I had vowed at that point that it wouldn’t happen again.  And here we are at nearly 2L of water a day, spread out, and that’s usually when I’m working.  If I’m not, it’s around 1 1/4L.  That’s right around where I should be to match the above chart and sit in the good range.

Red. Red can be a sign of urine in the blood which can mean a Urinary Tract Infection (UTI) or Kidney Infection, enlarged prostate, malignant or benign tumors, kidney cysts, kidney or bladder stones, lead or mercury poisoning, or just a symptom of long distance running.  Red urine can also be a non-problematic symptom of some medications (Senna laxatives, some antibiotics, etc.) or some foods (beets, for example).  It’s always best to check though.

Blue or Green. This can be as simple as having some dyes in your diet (Kool-Aid can do this), medication, UTI bacteria, or familial hypercalcemia (a genetic disorder).

Dark Brown or Tea-Coloured. Food like fava beans, aloe or rhubarb can colour your urine this tinge. Liver and kidney infections, UTIs and a variety of medications can darken your urine.

> You can learn more about urine colour from the Mayo Clinic.

Amount

I get a hard time about going to the washroom once every two hours (or more frequently if I chug the water) but at the end of the day, I know it’s more about my health.

While I’m not a follower of Dr.Oz, he claims your urine output should be between 1 to 2 litres a day.  So, think about it – in terms of the amount of water (or other liquids) you drink, and all your fresh veggies and fruits (which contain water), how much are you really peeing?  If you’re not getting about that much out, it’s a sign of dehydration, or kidney disorder.  If you’re peeing more than that amount, which I sometimes do, it can be a sign of diabetes, kidney disease or just too high of a fluid intake.  (I have checked my blood sugar on numerous accounts and am always a steady 5.0 to 5.4 and the kidneys are functioning… No worries here!).
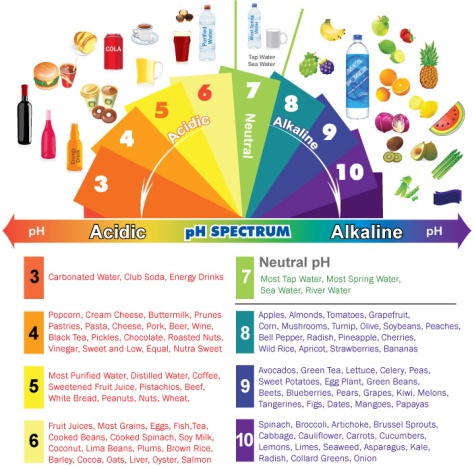
Urine PH

With urine PH, you should be aiming for a very neutral 7.0.  This is an easy test to do as you can buy the strips at the grocery store or health food store (we saw them the other day at the Superstore for $12.99 in the Natural Source section).  You want to aim to check your urine PH a few times a day, as things like what you eat can affect it.  You do not want to see high acidity levels on your urine PH.  For one, this can cause kidney stones.

An Acidic PH (below 7.0) can cause issues throughout your body ranging from digestive concerns to infertility to acidosis in your muscles.  An acidic body causes problems all OVER.  There are also MANY links between an acidic body and high cancer rates.  Urine PH can be a good way to nip your acid levels in the bud and get them down to a healthy range.

How?

This can be solved with diet – eating more fruits and vegetables and steering away from your commodity and conventionally raised meat products. Stay away from soda pop (you should see my tooth enamel.  Thanks Coke Zero!). Eat broccoli, avocado, cucumber, kale, cabbage!  These will take you into that prime, alkaline state you’re looking for.  I loved this resource from Mind Body Green and I think it’ll help you get a good idea of what should be on your low-acid plate:

acidic-alkaline-phchart

As for low alkalinity, I don’t think I could have explained it any better than Natural News does here: http://www.naturalnews.com/023097_alkaline_water_body.html

You want to aim for that balance, leaning more towards alkalinity than acidic.  Track your PH. See what foods move you one way or the other.  Stress also plays a role.  Keep playing around until you reach a balance.  I’ll talk more about alkalinity and acidity in the body in the posts to come.

Smell

Man, I like talking about pee as much as the next girl but I’m not encouraging anyone to take big morning whiffs of the yellow stuff.  If you know what I’m saying.

What I am proposing, though, is that you should be attentive to the scent of your urine.  You’re looking for a sweet scent (can be a symptom of diabetes as the high blood sugar has made its way out of your blood and into your urine).  If you notice a very STRONG urine scent, this can be indicative of dehydration – pair this up with your urine colour chart to get your answer.  UTIs can cause a foul-smelling urine, while maple syrup urine disease (the inability of your body to process certain amino acids) causes your urine to smell like maple syrup – it’s genetic.

Extras

It should not hurt to pee.  This can be a symptom of a UTI and some sexually transmitted infections (STIs).  It’s definitely a reason to be checked out.  For women, pelvic floor muscle strength is important for preventing incontinence.  Here’s a great article from Mommypotamus about kegels and peeing in the shower (it’s good for you!).

You should always be attentive to your bodily health and urine is no exception.  You pee (or should be) 2L a day, spread out.  It takes up time, and that time can be used to get a good image of your body’s excretory system and overall health.

Have a great weekend all, and I’ll be back posting again soon, a married woman.  Best wishes.

Resources

http://www.mindbodygreen.com/0-6243/How-to-Balance-Your-pH-to-Heal-Your-Body.html

http://www.mayoclinic.com/health/urine-color/DS01026/DSECTION=causes

http://www.medicinenet.com/urine_odor/symptoms.htm

Managing Die-Off & How To Feel Better

Bacteria

In the process of restoring my gut to functioning levels, I’ve encountered a problem. Die off.

What in the world is die off, you ask?

Die off (also known as Herxheimer reaction) occurs when good bacteria re-enter the gut and begin to clear out and kill the bad guys (candida, parasites, viruses, etc). Unfortunately, what happens is that when these “bad guys” die off, they release toxins.  These toxins make you feel like crap.  Some of your symptoms include:

  • fever
  • muscle aches
  • chills, cold in extremities
  • headaches, fatigue, dizziness and brain fog
  • skin rashes, eczema flare ups
  • excess mucus
  • gas, diarrhea, constipation, bloating
  • swollen glands
  • body itchiness
  • arthritis flare ups
  • etc.

Die off typically occurs in one of three circumstances:

  1. You’ve incorporated probiotics into your diet
  2. You’ve gone on an antibiotic, or;
  3. You’ve started a real food diet that you’re not used to.

I decided to up my probiotics due to a perceived issue with candida and a known effect of aspartame usage, wreaking havoc on your gut and microflora.  As a dedicated diet pop drinker for six years, with a philosophy of, “Well, I’m going to die anyway…”, I’m fairly certain that my digestion has suffered.  Not to mention, my family has a history of Irritable Bowel Syndrome and Celiac.  I finally got my sense together, gave up the pop (2013 New Years Resolution) and have been rehabilitating slowly with a real-food diet.  As a side effect of upping my probiotics, I’ve experienced some severe die off symptoms.

fermentfri2

Part of my problem is the speediness of my kefir consumption.  I fell in love with kombucha first.  On a trip down to the Root Cellar in Charlottetown this summer, I found the weirdest looking drink to give a try.  We were in a week of 30 degree weather (celsius) and I was sweating buckets, waiting for the bus in the mid-day sunshine.  My first bottle of kombucha was a sparkling masterpiece – mint and chlorophyll. I was hooked.  Unfortunately, not a single kijiji ad for a SCOBY in sight, and with a move planned in the near future, I didn’t want to be midway through re-hydrating one and break the jar in transit.  So once we moved to Summerside, I planned to pick one up when we travelled to Halifax for our wedding.  In the meantime, I found some water kefir grains – the appeal being their ferment time was only 48 hours.  Well, downhill we went.  Without a health food store in Summerside (any interested entrepreneurs, here is your chance!), I hadn’t had kombucha in a while so I was excited to get brewing.  And man did those little fellows rehydrate – they’ve multiplied like wildfire, and with A being very take-it-or-leave-it about the kefir, I’ve been chugging it.

So, yes, this is all my fault.

But, hey, I’m already in this far anyway.  My real problematic personal characteristic is I’m competitive.  With myself.  In the least beneficial avenues. So I don’t want to give up on the fact that I’m already this far into my probiotic-gut-saving-diet.  Even if I’m so gassy, my stomach hurts.

That only happened last night.  Cramps, bloated, gassy.  TMI, I know. But you’re here, reading about probiotics, and I will tell you straight-faced, if you have never had gas in your life, you’re lying.  I have also been dealing with a bit of arthritis flare ups but nothing too unmanageable.

How Could I Have Prevented This? What Can You Learn From My Mistakes? How To Manage?

  • GO SLOWLY – Really, there’s no need to chug 16oz glasses of kefir when you’re getting started.  Especially if you’re not used to probiotics, and like me, your gut is to-hell-in-a-handbasket.
  • Detox BathsUnless your bathtub is leaching lead, like ours most certainly is (oh, the wonders of renting an apartment in a turn of the century building), detox baths are great.  I’ve heard using redmond clay is great for absorbing those chemicals.  Epsom salts are also fantastic and de-stressing (stress can make your symptoms worse!)
  • Supplement – Molybdenum or Milk Thistle.  I’ve also heard good things about rosemary.  These help your body expel the toxins and support your liver in the process of cleansing.
  • Active Charcoal – This was on my list of things to try.  Unfortunately, the local pharmacy didn’t carry any when we were in last so it’ll be on our list of things to pick up in the city.
  • (If You Aren’t Already) EAT REAL FOOD – I can’t stress this enough.  I took a few months to settle into our real food diet before actively fermenting and incorporating probiotics. This goes for taking your probiotics in a pill, too.  If you knew the stove was hot and you’d burn yourself if you touched it, would you do it?  Over and over?  This is what trying to heal yourself is like when you keep eating Mickey-Dee’s breakfast, noon, and night. You know the burner is hot (that crap will kill you) and you keep touching it over and over again.  A wise science teacher once told me that the definition of insanity is doing the same thing over and over, and expecting different results.  If you eat junk, your body will stay junky!  EAT REAL FOOD.
  • Get Lots Of Sleep – This comes with relaxation and de-stressing.  Your body is trying to work at peak performance to clean you out and rebuild your gut.  Let it work on all cylinders.  Plan your time out to begin your gut cleansing and healing.  Make sure this will be a non-stressful time.  Do it when you have a vacation from work, or when you know you’re between big projects and the workload is lighter.
  • Practice Meditation – A and I had a discussion about what meditation is to us yesterday. I like to take time as I’m going to bed an imagine my perfect place – our future house (for any of you who are believers in “The Secret”, here’s your opportunity to visualize).  Sometimes, it’s as simple as sitting in a dark room, just listening to some relaxing music with my eyes closed.  A likes relaxation and meditation in the form of a bike ride without music, settling into the steady motion of cycling.  Neither one of us are great with sitting down and keeping our thoughts and minds still.  We’re both THINKERS.  It’s not worry thoughts, just something.  I find when I’m doing my meditation, by focusing on one thought – be it the song, or the image of my dream house – I keep the invasive thoughts out.  This is great for getting through the pain and discomfort of the detox and die off.  Think happy thoughts!
  • Peppermint Oil – Clears the brain fog and helps with headaches.  A quick whiff is all you need.  Try mixing some with a carrier oil like almond oil and put on your wrist like a perfume.  Your body temp will keep it warm and allow the scent to be there and ready whenever you need a wake up!
  • Get Outside – Vitamin D never hurt anyone and it’s a great feeling to reorient yourself with nature.  It’s what it’s all about, right?

578470_369246169779619_2086680511_n

I’d love to hear more from others about their experiences.  To me, this die-off period is a reminder that in order to be healthy, I have to reverse my previous decisions as a teen.  It’s a reminder to be mindful of what I choose to do with my body, my temple, and to treat it with respect.  Treat yo’ self. Love yourself. And best of luck in your health.

Resources

http://scdlifestyle.com/2012/06/5-die-off-myths-everyone-needs-to-know-about/

http://www.thecandidadiet.com/candida-die-off.htm

http://gnowfglins.com/2012/08/22/probiotics-taking-it-slowly/

http://www.20somethingallergies.com/healing-digestion-restoring-mucous-layer/

Homemade Monday: Bone Broth & Broccoli Soup

naturallylivinginthemaritimes.com

So, I’m mixing it up a bit.  We’re doing a more VEGETARIAN-oriented meal with a bone broth.  So a little bit veg, a little bit GAPS, and a whole lot of delicious.

A and I went down to the Summerside Farmer’s Market on Sunday and got a great looking soup bone.  The time was right for making beef broth yesterday, so out came our trusty crockpot and away we went.

How To Make Beef Broth

naturallylivinginthemaritimes.com

  • Soup Bone (grass fed cow – gelatin and nutrients are more available and over all better quality)
  • 3 stalks of celery – chopped
  • 3 carrots – chopped
  • 1 onion – diced
  • 3 cloves of garlic – chopped
  • Enough filtered water to fill crock 3/4 of the way
  1. Fill your crock with your prepped vegetables, soup bone and water.
  2. Set on low and let cook for 24 hours.
  3. Strain and can in a pressure canner, or use within the week in the fridge.  We don’t have a pressure canner BUT we make soups at least once or twice a week so this is never a problem for us.*

* Due to the low acid content of the broth, it is not encouraged to water bath can these.  We’ve done it, but like I said, they only sat for a week anyway.  Our plan from here on out is to hot pack and then put in the fridge to hopefully cause the vacuum seal from temperature difference, causing a sterile seal – we might get a month out of them if we can.

What Can You Make With It?

This recipe came from Healy Real Food Vegetarian.  It is tried and tested, and we LOVE it. We’ve tweaked the recipe to our liking and love it a bit spicier with cayenne, but to each their own.  Click on the picture to head over to the original recipe.

broccoli-soup-800x533
Credit: Healy Real Food Vegetarian

DIY Saturday: Making a Simple, Eco-Friendly, All-Purpose Cleaner With Vinegar & Water (Better Late Than Never)

http://naturallylivinginthemaritimes.com

This week’s DIY Saturday is going to be short and sweet.  Why? Because the DIY is SO easy and simple to do, it doesn’t take much explanation.

Why MAKE My All-Purpose Cleaner?

Part of our journey into being more eco-friendly was to make our own cleaning products. I grew up in a family where Vim was how you cleaned toilets, Windex was how you cleaned windows and Lysol was how you cleaned tubs. No wonder my hands were always so itchy after Saturday morning chores.  Well, NO MORE.  After reading Ecoholic, I determined that we’d give the vinegar solution a try.  I expected that I’d be scrubbing forever, without results.  I didn’t think that it would work.

Well, let me tell you how VERY wrong I was.  The vinegar and water solution is a cleaning dream come true.  I cleaned the burnt-on junk out of our oven with it, the sink’s coconut-oil toothpaste mix, A’s sriracha-sauce mishap (he managed to spray half a bottle of Sriracha Hot Sauce all over our walls one afternoon), I wipe our windows (streak-free might I add), and I plan to use it today to clean the purple rings from my countertop due to some overly enthusiastic kraut-chi.  I can’t even begin to express the money you save from cleaning with vinegar and water, as well as the health benefits to your skin, airways, and overall self.

Here’s a link to the VIM Cleaning Product MSDS Sheet, just for fun.

Windex has a lot of curious “no data available” in much of their MSDS sheet.  But definitely call poison control if you ingest it, we just aren’t saying why or how it’s toxic….

Lysol All Purpose Cleaners (the liquid in the yellow bottle), is known to be a hazardous material, according to their MSDS sheet.

If you have children, it should probably worry you having all these poisonous chemicals in your house.  This is how the poison control number gets called.  If you have pets, this is also a concern.  My rabbit will chop into anything that is in her path.  With vinegar, there really isn’t anything to be concerned about.

Here is an industrial vinegar’s MSDS sheet.  I couldn’t even find one for food-safe vinegar.  The main thing to be worried about here is if you’re huffing vinegar regularly.  Probably not the best idea. But otherwise, do as you please.

So How Do I MAKE an All-Purpose Cleaner?

http://naturallylivinginthemaritimes.com
Ingredients

You’ll need:

  • 5% White Vinegar (easily obtainable at ANY grocery store)
  • Filtered Water (if you’ve got a filter, you might as well use it)
  • 5-10 drops essential oil (Optional)*
  • Spray Bottle (non-reacting plastic or glass)

*I find the essential oil, like peppermint, mutes the VERY vinegar-y smell, which some do not like.

  1. Take your bottle and fill it with one part vinegar, one part water.
  2. Add your drops of essential oil.
  3. Screw on cap.
  4. Get ready to spray.

Really, it’s that simple!  It takes less time making it than it would take you to navigate the chemical section of your Wal-Mart.  Seriously.

PS: As usual, I had my trusty kitchen sidekick.  Today she wasn’t impressed that I wasn’t feeding her, but focusing on other things.  OBVIOUSLY, the kitchen is JUST for storing rabbit food.

http://naturallylivinginthemaritimes.com
Bunny is not impressed.

Fermenting Friday: Do you SOAK your grains? Maybe you should…

soakinggrains2

Sprouting, Souring, and Soaking… There are so many things to think about when dealing with seeds and legumes. I’ve recently learned about soaking grains.  And since then, we’ve been on the grain soaking bandwagon (except for A’s bread, which he refuses to adjust because it’s his masterpiece).  While I could go into more discussions about souring and sprouting, I’ll leave it be and fill you in about grains.

Why Do I Need to “Soak” Grains?

Soaking grains is essentially mimicking nature in germinating the seed.  By letting the grain sit, the enzymes go to work, breaking down what the seed has as protective measures which actually inhibit our digestion.  Soaking makes the digestion easier and allows us to make more use of the grains we’re eating.  By soaking, we’re allowing for the breaking down of the grain and it eases the whole process for our systems.

“All grains contain phytic acid in the outer layer or bran. Untreated phytic acid can combine with calcium, magnesium, copper, iron and especially zinc in the intestinal tract and block their absorption. This is why a diet high in unfermented whole grains may lead to serious mineral deficiencies and bone loss. The modern misguided practice of consuming large amounts of unprocessed bran often improves colon transit time at first but may lead to irritable bowel syndrome and, in the long-term, many other adverse effects.” – foodmatters.tv

Soaking grains is a traditional method that is not only seen across human culture but in animals too.  Some birds mimic this soaking process in their mouths, by letting the grains break down there before eating it!  At the most basic level, soaking grains is a natural thing.

How Do I Soak Grains?

Soaking grains is typically an overnight process but it can

take as long as 24 hours, depending on grain and depending on recipe.  We’ve done recipes where we’ve made the mixture at 7pm one night and we fry them up at 10pm the next evening – because I’m working.  They’ve turned out well, a little tangier, but very good.

The recipe I’d love to share with you is one we’ve been working with for a short time and feel confident we’ve already mastered. It’s a great option for quick meals, and it’s fun to make. Except for the rolling and frying, the process is fairly hands off.  Most of the effort is microscopic, which is fantastic.  We make the dough and just let nature do its thing.

We got the recipe for Soaked Tortillas from Modern Alternative Mama and haven’t done much alteration to it, other than extending the soaking period from time to time and adding a bit more filtered water as the dough can be too dry without.

  • 3 1/3c whole wheat flour.
  • 1/4c coconut oil
  • 1c filtered water
  • 2 tsp real salt

After Soaking…

  • 3tsp baking powder

How To:

  1. Add flour, SOFTENED coconut oil, water and salt to a bowl and knead through.  It’s a pain in the neck to try to get room temp coconut oil to mix into this without having to break up individual clumps so save yourself the time and annoyance.
  2. Cover with a cloth and let sit overnight.  Like I said, we’ve left this recipe for around 24 hours and it’s been JUST FINE.  Don’t feel pressured to get this done at 6am before you head off to work.  It will LIVE.
  3. When you’re ready to start forming them, knead in the baking powder and separate into about 18.  Roll out as THIN as you can for a more tortilla feel, a little thicker if you want more of a flatbread.  (The flatbread feel is great for an open face guacamole and alfalfa sprout sandwich!).
  4. Fry on medium in a coconut oiled pan until golden on both sides.  We have gotten into a pattern where A rolls and I fry.  As soon as A is done one, I’ve managed to flip and cook through on both sides.
  5. Let cool and use.

These little guys are fabulous.  We had a girlfriend over last night for drinks and apps and toasted these guys with some salt in the oven, paired it with salsa and guacamole, and it went wonderfully with a fresh margarita, handmade by A.

Sidenote: Small Whole-Wheat & Heirloom Whole Grains Shpiel 

soakinggrains1

If you’re not doing whole grains or heirloom grains (kamut, einkorn, millet…), you should start now.  White flour is the source of all evil.

That is TOTALLY exaggerating, but much nutritional evil.  White flour (especially bleached) is of no use to our body, other than simple sugar. For A, struggling with hypoglycemia, we are fighting a battle daily to stabilize and maintain normal blood sugar levels.  White flour (and sugars) cause dips and changes in blood sugar as it is so quickly absorbed. Whole grains are more stable. Don’t get me wrong, we do still have some all-purpose flour in our house but it’s used sparingly, at minimum, a 50/50 all-purpose to whole wheat ratio.

Aroma-Thursday: Spotlight on Peppermint Oil

peppermintoil1

Oh, I LOVE, LOVE, LOVE my peppermint oil.  I honestly don’t know what I’d do without it.  It’s one of the first essential oils I’ve purchased and it’s been so versatile.  Even A, who is not a big peppermint fan, hasn’t minded me putting it everywhere.

Uses for Peppermint Oil

Peppermint Oil is great for indigestion, heartburn and irritable bowel (these all run in the family, and hopefully, I’ll be spared of them!).  For those of you working on clearing out and revamping your digestive system, peppermint is a MUST HAVE.

According to Web Md*, peppermint oil can also be used for:

  • Morning Sickness!
  • Vomiting
  • Nausea
  • Cramps
  • Diarrhea
  • Overgrowth of bacteria in intestine (gut people, take note!)
  • Gas
  • Colds & Coughs (Your immune system is primarily in your gut! This is why you have these benefits!)
  • Sinus & respiratory infections
  • PMS & Menstruation Cramps
  • Liver and Gallbladder Problems’
  • Headache
  • Muscle Pain
  • Toothache & Mouth Pain/Inflammation
  • Joint Conditions
  • Allergic Rash & Itchiness (unless, of course, you’re allergic to peppermint, but I believe that goes without saying).
  • Bacterial & Viral Infections (like tea tree oil, peppermint oil is a great antimicrobial and that’s why it’s one of my go to’s in my Natural Hand Sanitizer)
  • Repelling Mosquitoes

*Normally, I don’t count on WebMD because, 9 times out of 10, on their symptom checker, an STI is an option when you probably just have a cold, but their A-to-Z isn’t too bad.

How Have We Used Peppermint Oil?

1. Natural Hand Sanitizer: Like I stated above, it’s one of my go-to essential oils for my DIY Hand Sanitizer.  It smells terrific, and it keeps my hands clean in the cold & flu season.

2. To Keep the Colds Away & Clear Sinuses: For someone who doesn’t like peppermint, A can POUND back the peppermint tea.  I love it too, especially chilled!  We’ve also steamed it and use it for a good anti-coagulant to clear out the nose.  It also, side note, makes the house smell great!

3. Peppermint CANDY: Great to flavour some holiday fudge!  I can’t wait to try it in Life By Jeanie’s Coconut Oil Fudge!  

4. Gastrointestinal Pains: If you rub it in a carrier oil on your stomach if you’re cramping, it is great to soothe.  Almond Oil is a great carrier oil for this use.

5. Natural “VAPO-RUB”: Mix a bit of peppermint oil in coconut oil and use it as you would a vaporub at night.  Keeps your nasal passages clear for a good night’s sleep when you have a cold.

6.  Cooling Baths: On a hot day, add some peppermint oil to your bath water.  Even in a warm bath, the peppermint oil will keep you cool, long after you get out!

7. Energizer: Add some drops of essential oil with a carrier (Almond Oil is GREAT) to your temples for relief of a headache or just to jump start your day, caffeine free.

8. Bunny-Repellant: The stinkster (Binky earned herself the nickname…) has a habit – like all other rabbits – of enjoying the mouth-feel of wires. And shoes. And anything rubber, really.  That’s how we lost our keyboard, the VGA cable, and the input button on our TV remote control.  Peppermint oil sprinkled on wires or certain areas means that she avoids it like the plague.  She just doesn’t like the smell!

peppermintoil2

9. Bug Repellant: This also works well for other bugs.  When we had bugs in our new apartment, we spritzed the floor with a 1 part vinegar to 1 part water mix with about 15 drops of peppermint essential oil.  We re-spray about once a month and it keeps the earwigs, and other little buggies down.

How Do You Use Peppermint Oil?

Let me know if you’ve used peppermint oil either in the ways listed above, or otherwise, in the comment section below!  I’d love to learn more from some of my readers!  Best wishes with your natural wellness and happy Thursday!

Wednesday Update: A bit about us, Kamut-Oat, Whole-Wheat Pumpkin Muffins, Kraut-Chi

whateverwed2

Today’s “Whatever-Wednesday” so I figured I’d throw a couple recipes out there.  Last night was grocery night so it ALSO ended up being a night of baking and fermenting.  It was nice to have the day off work because it meant A & I could work together in the kitchen and get a lot done.  The funny thing is: the two of us can spend hours together in the kitchen in good spirits but the moment we have to do dishes together… no way…

We’ve both figured out our own methods for doing dishes – I like to get them all done in one go, drying if need be – A hates to dry halfway through and doesn’t think the dish towel does as well as air drying; A likes to do them in two batches, and it makes the counter top look messy to me.  We need a dishwasher to solve this argument, but until then, we’ve determined the best way to manage is to avoid doing dishes together.

I managed to chat with a few other members from the Village Green Network and her writing gave me the push I needed to start some serious fermenting. Food Savvy from Halifax had a fun post about how she “stopped her hubby’s gas”.  This said, really, who doesn’t have gas?  But being as we’re aiming for a healthier lifestyle, and that I’m sure the 6 years of Diet Pepsi drinking (exclusively… I only drank water when I was REALLY thirsty) has ruined my gut, I figured now is as good a time as any.  So we picked up some red cabbage (A said, “why would anyone ever mistake that for red? It’s clearly purple”), farmer’s market garlic, carrot, ginger, caraway, juniper berries, mustard seed and a scotch bonnet and did our thing.  AND our handy-dandy Real Salt and filled some mason jars.

A few new things in our cabinet include Just Us’ Milk Chocolate (NO SOY LECITHIN) which is delicious.  Just Us’ whole philosophy is all about fair trade and sustainable practices.  While I was studying sustainability at Dalhousie, we had the pleasure of having a lecture lead by the Just Us founder.  The other new thing would be “The Golden Drop” Mead from PEI.  Neither one of us had ever tried mead before and we decided that before trying to brew it, we’d like a taste.  It was really good, with a honey flavour.  A decided he didn’t like it enough to brew so we think we’ll skip on that.  But it would be a good purchase from time to time.

whateverwed5

NLM Mason Jar Kraut-Chi (adapted from Sandor Katz’ “recipe“)

  • 3/4 large head of red (ahem…purple) cabbage
  • 3 big cloves of garlic
  • 1 orange scotch bonnet
  • 2 carrots, sliced thin
  • 3 inches of fresh ginger
  • 1 tbsp caraway
  • 1 tbsp juniper berries
  • 1 tbsp mustard seeds
  • filtered water
  • 2 1-litre mason jars with lids
  1. Finely slice your cabbage into small strips and add salt liberally as you go, piling them into a bowl.
  2. Squeeze the juices out of the cabbage with your hands.  The salt should have begun the process.  I took advantage of A’s manly hands, as mine were getting sore.
  3. Cut up and add in your scotch bonnet, garlic, carrots, ginger, and spices.  Mix all through thoroughly.  Take a taste test to make sure mixture is salty, but not too salty.  The salt is what helps ferment but keep your mixture safe. Adding hot peppers (like the scotch bonnet) also keep away mold.
  4. Begin to pack your jars as tightly as you can.  Add water (filtered) over top of your mixture, at least an inch.  You do not want your mixture above the water as it will begin to rot.
  5. Keep mixture out for about 5 days to a week, depending on how strong you want your ferment.  Then move your jars to a cool, dry place to slow the pace down.  After a week down there, they’ll be ready to eat.  You may want to let them sit longer, according to taste.

Our mixture is a beautiful purple colour with a bit of orange.  Very Halloweeny – perfect!

A and I have decided this might be a Christmas gift for a specific someone on our list.  We’ve decided this year to do a DIY Christmas – mostly because we’re broke, but also because it’s coming from the heart.  Every gift we do will be unique and specially thought out and made for that one person.  I think homemade gifts are the best and that’s always what I hope for around the holiday season.

I was also in the market for a decently easy snack to make for A because he’d been low-blood-sugary all day.  His tell is often a headache, and he’d already taken two St. John’s Wort so I had to find something quick.  I found myself with left-over pumpkin from our Pumpkin Pie Baked Oatmeal from Mommypotamus, last week (delicious, by the way).  I’d done up my first pie pumpkin in the oven (very much like baking a squash) and mashed it up.  I’d been looking to do something with it and realized it’d been years since I’d made muffins, and hey! Isn’t that the organic Kamut flakes I bought on sale last week at the Bulk Barn…

NLM Kamut-Oat Whole Wheat Pumpkin Muffins (Dairy-Free) – (Adapted from KitchenTreaty)

whateverwed1

  • 2 cups whole wheat flour (we use Speerville Mills in Woodstock, NB)
  • 1/2 cup organic kamut flakes
  • 1/2 cup rolled oats
  • 1/2 tbsp baking powder
  • 1/2 tsp baking soda
  • 2 1/2 tbsp cinnamon
  • 1 tbsp nutmeg
  • 1 cup basmati rice milk
  • 1 tbsp white vinegar
  • 1 cup pumpkin puree
  • 3/4 cup sucanat
  • 1/3 cup coconut oil, melted
  • 1 egg
  • 1 tbsp vanilla
  • 2 tbsp brown sugar (for topping)

whateverwed4

  1. Preheat oven to 400.
  2. Add in pumpkin, egg, melted coconut oil, egg, vanilla and mix.  Mix rice milk and vinegar together and then add in (makes a mock-buttermilk).
  3. Once mixed through, add dried ingredients: flour, kamut, oats, baking powder, baking soda, cinnamon, nutmeg, sucanat.  Mix all together.
  4. Move mixture to a muffin tin and divide evenly into 12.  Add a sprinkle of brown sugar to the tops of each muffin to give a sugary crust. (I know, not healthy.  But delicious.  Moderation, right?).
  5. Bake in oven for 15-20 minutes (until crusts are crisp and a knife comes out clean) and let cool for five.

These muffins are hearty enough to keep A’s tummy from rumblin’ and his blood sugar from dropping.

We’re now officially 9 days away from our wedding and we’ve still managed to organize some delicious treats for this

week, including:

  • Fresh Raspberry Jam
  • Kamut Oat Chocolate Chip Cookies
  • Soaked Apple Crisp
  • Potato and Pepper Soup
  • Chickpea & Red Cabbage Tortilla Pizzas
  • Guac and Sprout Sandwiches
  • Corn & Chipotle Soup
  • and if we can wrangle some up at the farmer’s market this Saturday… Liver & Onions.  Neither one of us have ever tried liver before but after watching Real Food Con videos, I have to give it a shot.

I’m sure, just like last night, the bunny will be quite ready to help with all the scraps.

whateverwed3

Best wishes for another fantastic week and thanks for coming by.

DIY Toothpaste (What’s In Your Mouth?)

toothpaste4

I know it’s not DIY Saturday.  But, I’ll tell you, our toothpaste situation is getting pretty dire and couldn’t wait.  And I’m not ready to tell you about the book I’m reading yet so DIY Tuesday it is!

Why do we make our own toothpaste?

Have you ever read the back of a toothpaste bottle?  I dare you to explain to me what all those ingredients are.  We were diehard Colgate Total users for a while.  Until this (thanks, ingredientpal.com)

Sodium Fluoride – (0.24% – 0.14% with fluoride ion) is used to prevent cavities.  According to ora-heal.com, “Colgate toothpaste contains enough fluoride in four ounces to kill a small child within 2 to 4 hours! “.

Triclosan – (0.30%)  Animal studies have shown that triclosan causes hormonal disruption, concerns raised that Triclosan is making bad bacteria resistant to antibiotics (FDA). Used to prevent gingivitis.

Hydrated Silica – Used as a whitener, it wears away tooth enamel. It is used as an abrasive.

Water – For all the filtered water drinkers, the plant is in NY.  If you’re trying to avoid fluoride, here’s another source.

Glycerin –  Burning skin reactions are possible, according to webMD.  Keeps product from drying out.

Sorbitol– A sweetener with gastrointestinal effects. Here’s a petition to the FDA calling for it’s regulation due to likelihood of inducing diarrhea, heartburn, cramps and nausea.

PVM/MA – a glue to keep ingredients together.

Copolymer – Glue to bond fluoride and triclosan to teeth to increase their benefits.

Sodium Lauryl Sulfate – Skin irritant which can cause reactions in the majority of the population.  Causes “foaming” reaction. “Toxicology reports that SLS can penetrate and be retained in the eye, brain, heart, and liver with harmful long term side effects” (Ora-heal).

Flavour – What is that even made of?

Cellulose Gum – Thickener.  Adds texture, volume.

Sodium Hydroxide – Neutralizes the PH of other ingred   ients.

Propylene Glycol – Contradictory results in studies on safety: provokes allergic reactions in people with skin allergies or eczema; liver, skin and kidney damage is listed as a side effect on it’s MSDS sheet, called a hazardous substance; acute toxicity found in IV studies.  Also used in hand sanitizers.

Carrageenan – A thickener.  See Empowered Sustenance‘s post on the toxicity of carrageenan.

Sodium Saccharin –  Artificial sweetener.  Which we all know are very, VERY healthy… not…

Titanium Dioxide– Gives the toothpaste it’s “whiteness”.  Also, a potential carcinogen according to the Canadian Centre for Occupational Health & Safety.

(Big thanks to the MotherNatureNetwork for the extra information to fill in my blanks!).

How do we make our own?

A & I have our own recipe that we’ve melded together from trying a few and finding what we like best.

  • 3 tbs baking soda (the cleaner!)
  • 2 tbs (warmed) coconut oil (the thickener!)
  • 1 tea salt (the abrasive!)
  • 15 drops of essential oil (the flavour!) – I use peppermint, A uses orange.
  • pop top mason jars, little ones.  (the container!)

You should first warm your coconut oil until it’s liquified.  This takes seconds on the stove.

toothpaste5

Add your baking soda and salt to your jars, then add your coconut oil and essential oils.  Give it a good mix and let it set.  It’s cold here so it sets pretty quickly.  You may notice the flavour is a little salty to begin with but you do quickly get used to it.  You DON’T have to eat it (but unlike conventional toothpastes, you don’t need to call poison control if you swallow some).

We find (with brushing our teeth at home, twice a day) that this amount gets us through about a month before we have to make more.  Much more economical, and no annoying squeeze bottles or toxic chemicals to contend with.  A win-win-win.

toothpaste1

toothpaste2

Do you have any cavities?

NO! In fact, my teeth are looking much brighter paired with regular oil pulling.  Three cheers to great, natural, oral health.

Meatless Monday: Our Version of Indian Pilaf

pilaf

I decided I’d take the weekend off.  I needed some sleep and some rest, and just a bit of time with A before the big day.  Not to mention I was also working all weekend.

So, here we are: Meatless Monday.

And in honor of Meatless Monday, I’m going to treat you to one of our most favourite, meatless, budget-friendly recipes: Indian Pilaf, adjusted from Veggieful.  We have made it a little spicier (with the cayenne), removed the lime (too much for us), subbed coconut oil for olive, and added carrots for more flavour.

  • 1 tablespoon coconut oil
  • 1 onion, chopped
  • 2 cloves garlic
  • 1 head of broccoli, florets
  • 3/4 cups chopped carrots
  • 1/2 head of cauliflower, florets
  • 2 tablespoons of korma paste
  • 1 1/2 cups of brown basmati rice
  • shake of cayenne pepper
  • 1 cup chickpeas, soaked
  • 3 cups vegetable broth
  • Salt & Pepper to taste
  1. Chop all your veg (onion, garlic, broccoli, carrots, cauliflower) and get pan ready with coconut oil melting on medium heat.
  2. Add and saute garlic and onion until nicely browned.  Add your vegetables, rice and korma paste and allow all to mix in together.
  3. Once mixed, and before it burns (KEEP STIRRING), add your cups of broth, cayenne pepper and chickpeas.  Allow to simmer for about 25 minutes.  We find the brown basmati takes a little longer to soak up the broth.
  4. Add salt & pepper to taste.
  5. Serve.

We’ve found this recipe keeps us for three days of leftovers.  It’s very inexpensive for the amount of food you get out of it.  The chickpeas do give you the protein you’re looking for and a great Indian flavour.


Fermenting Friday: Fermenting Fundamentals (Why? What You Need (Baby, I got it)? How?)

fermentfri3

Hooray! It’s the first Fermenting Friday EVER!  I hope you’re as absolutely excited as I am.  As I’m new to fermenting, I’m going to share with you what I’ve learned, and I can’t wait to give you my rehashed quick-and-easy version of how to ferment!

First and foremost:

WHY would you ever want to ferment?

I told a girlfriend of mine I was fermenting and she visibly shuddered.  The word “ferment” is to some the way “moist” is to others.  To me, when I hear FERMENT, I hear centuries of civilizations who’ve tried and tested amazing methods of pickling, sourdough baking, soaking grains, and brewing delicious things like kefir and kombucha.  I also hear wine & beer, and really, whats a good kitchen party without wine or beer.

fermentfri2

Fermentation has been found in civilizations as far back as ancient Turkey (thank YOU Michael Pollen for that awesome tidbit – buy Cooked here) and has been a part of Chinese, Russian, German, and many other cultures since, including here in North America.  People still do ferment.  Do you have Sauerkraut on your sausages? If it was traditionally made, the process to get that distinct ‘krauty taste is from fermentation.

Fermentation provides the great little bacteria that keep your gut nice and healthy.  It’s why I drink kefir (& soon, kombucha once I get my SCOBY!).  The GAPS diet specifically encourages the use of fermented foods (even just beginning with the liquids from them early in the introductory period) for those who are dedicated GAP(S)-ers. Any diet is benefited by the introduction of fermented foods.  It’s also very helpful for Vegans & Vegetarians (B12 absorption) and just anyone else with a known leaky gut or bacteria imbalance.  Or just anyone.

According to Mother Earth News,  fermenting foods:

  • makes nutrients more bioavailable (easier for your body to absorb).
  • predigests the foods (soaking grains, if you’ve ever done this, is a key example!).
  • adds additional nutrients and can nullify or remove the anti-nutrients and bad bacteria.
  • maintaining a good intestinal balance of good, and healthy bacteria (achieved by eating foods loaded in probiotics… ahem… fermented foods) can greatly strengthen your immune system.

Fermentation is also known to increase the B vitamins (including B12 which, for me, is a huge help) and Omega 3’s (The Healthy Ones) present in your foods!

Why wouldn’t you want to ferment?

What Do You Need To Ferment?

fermentfri1

Fermenting is a very easy process. All you need is a good jar, with a lid or a weight that encourages the food to stay under the brine so it doesn’t mold.  You’ll also need your item to ferment, your salt or whey (depending on recipe or choice) and time.

You can get big fancy fermenting crocks that can be very expensive, or you can use a crock pot.  You can use a mason jar with a little app. plate in it.  You can also get air locks with bubblers that are fancy little contraptions that allow for air to escape during the process but not explode your jar.

They look a lot like this.  I can’t vouch for this product specifically because I haven’t tried it, but that is what the airlocks look like.

If you aren’t using an airlock (like me), you can simply be sure to burp the jar (if you read the post on kefir, you’ll know that burping means that you open your jar to allow gas to escape instead of building up too much) daily.

I will be using mason jars and this is my first vegetable ferment done with lacto fermentation.

You do need to use salt (and good quality – I use Redmond’s Real Salt) for your brine.  It’s what keeps down the bad bacteria and encourages the ferment.  I’m all for fiddling with recipes, so let me know if you’ve experimented with more or less salt/whey and had good experiences (or not so good).

How Do I Ferment (Recipe Time)?

Check out the recipe for Curried Lacto-Fermented Cauliflower from Cultures For Health.

Next week, I’ll fill you in on how it went!